1.ABB机器人支持多任务(每台机器人本体***多一个运动任务)。
important; margin-bottom: 0px !important;">2.使用多任务,机器人要有623-1 multitasking选项
important; margin-bottom: 0px !important;">3.如何新建多任务?
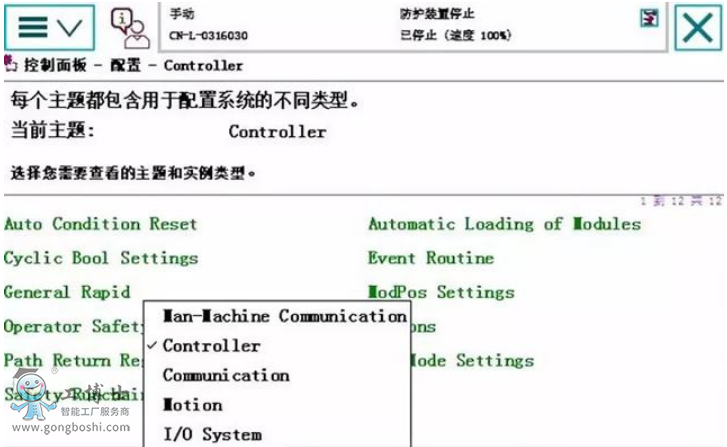
important; margin-bottom: 0px !important;">4.控制面板,配置
important; margin-bottom: 0px !important;">5.主题controller
important; margin-bottom: 0px !important;">6.进入task,新建一个
important; margin-bottom: 0px !important;">这个时候要设为normal,否则不能编程,全部编程调试好,再设回semi static就可以开机自动运行了。
important; margin-bottom: 0px !important;">7.重启
important; margin-bottom: 0px !important;">8.程序编辑器 进入t2 task。
important; margin-bottom: 0px !important;">9.如何多任务间传输数据?以下以任务间传输bool量flag1为例(即任何一个任务修改了flag1值,另一个任务flag1值也修改)
important; margin-bottom: 0px !important;">10. 前台和后台都要建数据,存储类型必须是可变量,类型一样,名字一样,比如:
important; margin-bottom: 0px !important;">Pers bool flag1
important; margin-bottom: 0px !important;">也就是2个任务里 必须都有这个flag1,而且必须是可变量。
important; margin-bottom: 0px !important;">11.在t2里,代码如下
important; margin-bottom: 0px !important;">12.前台任务代码如下
important; margin-bottom: 0px !important;">以上就能实现后台任务实时扫描di_0信号,如果di_0信号变1,flag1即为true。前台根据逻辑,一直等待flag1为true。执行过waituntil后,把flag1置false
important; margin-bottom: 0px !important;">13.如何运行?
important; margin-bottom: 0px !important;">示教器右下角***下面一个点开,确保2个任务都勾上,然后运行,可以测试一下
important; margin-bottom: 0px !important;">14.测试没问题,进入配置界面,把t2 改为semi static,重启,这个时候t2不能选了,已经开机自动运行了。


